Color Management

Starting from version 6, FitPlot allows to manage the color spaces of the imported images of type bitmap1, calling the color management panel from menu [cmd-shift-C] or, in the toolbar, clicking on: ![]() .
.
A proper use of the color spaces chain allows optimal results with regard to the correspondence of tones and colors between the original (picture taken) and the result (printed photograph).
How the new color management works in FitPlot
FitPlot subdivides the color flow of bitmap images in three phases:
- Initial color space [mandatory]
embedded [possible], in case already present in the image file
assigned [alternatively], whenever the embedded one is missing, FitPlot assigns a new profile, based on the user settings
- Working color space [optional], used to convert different initial spaces (from different images) in a common space (tipically of a wider gamut)
- Output color space [optional], used for finalization, tipically the same of the output device where we are going to print
With color space management, FitPlot offers to specialists a capillary control of the printing process, leaving however simplicity and quality results, also for the less demanding users, as always.
The color management panel
The panel where we control everything regarding the color process, it is invoked from the menu View->Show / Hide Color Management Panel [cmd shift C] or from the toolbar: ![]() .
.
It shows a table where each row represents an element in the FitPlot document (image, pdf or group).
We can manage the color spaces only for images of type bitmap1. Are therefore excluded vectorial files (pdf, eps) and the groups. For the latter, it's enough to ungroup [cmd-shift-G] to obtain the basic elements that, if of the right kind, can be included in the color management process.
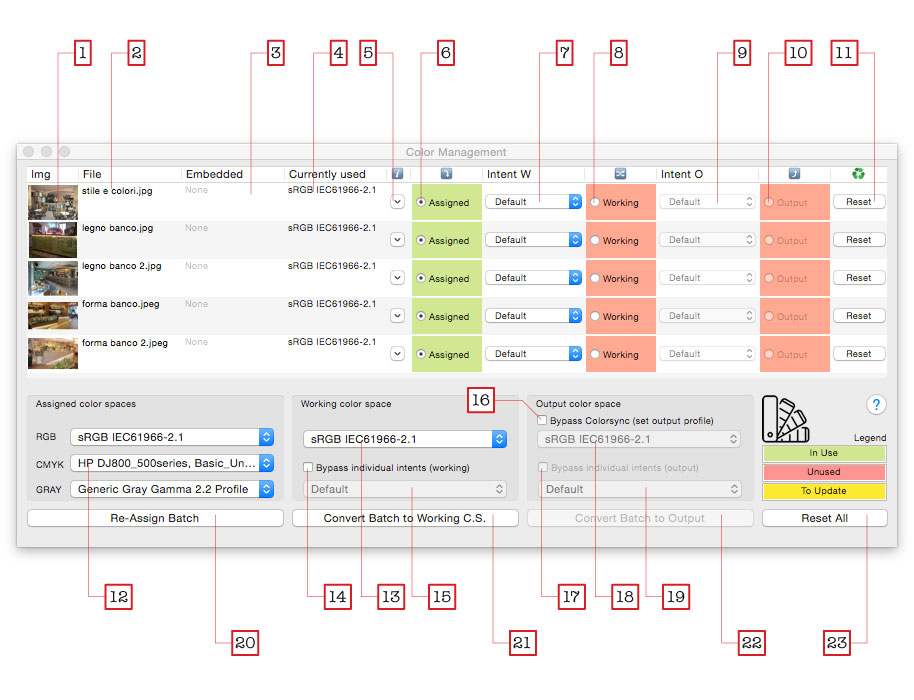
The table
In the leftmost column [ 1 ] we have a thumbnail of the element, aside there is the name of the file [ 2 ].
These are the "identification" columns that denote the subject on which the remaining columns are acting, regarding the color flow.
Let's see them, starting from the name of the embedded profile [ 3 ], whenever present, and, following, the name of the currently used profile [ 4 ] that may change according to the choices we'll go to make.
Follows the little column "informations" [ 5 ], marked by the letter ℹ️; it has a little push-button; clicking on it, a pop-over will show up, reporting the concatenation of the various profiles used.
There follow the most important columns, the ones where we can act, individually for each row / element, to govern the color spaces (assigned, working, output) with the relevant rendering intents (regarding conversions into working space or into output space).
The cells "assigned" [ 6 ], "working"[ 8 ] and "output" [ 10 ] are interspersed by the rendering intent pop-ups for the conversions into working [ 7 ]and output [ 9 ].
These cells contain a radio button, see the meanings in the summary "Color Management Operations"
Finally, it can not miss a reset button [ 11 ] to revert the image to the embedded (or assigned) profile only.
The profiles choices
Below, under the table, there are various profiles choices pop-ups. The items that populate these pop-ups are taken from the profiles available in our machine running system, see note Portability of color spaces 3.
Choices for profile to assign [ 12 ]
These are the profiles choices to "assign" automatically to images newly inserted that are unprovided of an embedded profile. We have three pop-ups; one for RGB images, one for CMYK and one for gray scale. The program is able to know the kind of image and assign the appropriate color space model.
Choice for working profile [ 13 ]
Here too we can choose from the various profiles available in our computer. Below the profile pop-up there is a check box that allows to bypass the [ 14 ] individual rendering intent5 and use a global one [ 16 ] for all conversions (into the working space).
Choice for output profile [ 18 ]
This pop-up is enabled only if we choose to bypass Colorsync [ 16 ], see note bypass ColorSync®4.
As for the working space, also here we can choose from our computer available profiles, and also here, there is the option to bypass the [ 17 ] individual rendering intent5 and use a global one [ 19 ] for all the conversions into the output color space.
The “batch” push buttons
At the very base of the panel there are the push buttons for the so called "batch" operations that allows to perform the same operation to all eligible images of the FitPlot document with just one click.
[ 20 ] Re-assign batch: assign again (because the first assignation is made automatically when inserting the image) the chosen profile (RGB, CMYK o gray, according to the image model) to all images that have the right requirements (bitmap, not locked).
[ 20 ] Batch convert to working color space: it converts into the chosen working profile, using the rendering intent5 individual or global (if bypass ON), all the images that have the right requirements (bitmap, not locked).
[ 22 ] Batch convert to output color space: this is enabled by the bypass Colorsync check box; it converts into the chosen output profile, using the rendering intent5 individual or global (if bypass ON), all the images that have the right requirements (bitmap, not locked).
[ 23 ] Reset: removes the possibly used output or working profiles, leaving only the assigned one (RGB, CMYK, gray, according to each image model), or the embedded one, if existing.
Color Management Operations
Assignment
Clicking on the radio button "assigned" (that is enabled only if the image has not an embedded color profile), a color space (RGB, CMYK or gray, depending on the image color model) is assigned to the image of that row, taking it from the chosen items in the assignment's pop-ups. Of course FitPlot is not able to modify the embedded color profile of an image, it would not make sense. FitPlot is however able to convert the image with an embedded profile in another image with another color profile.
Conversions to working profile
Clicking on the radio button "working" we perform a conversion of the image from the profile assigned (or embedded, when present) to the color space chosen in the pop-up of the working color spaces.
This conversion is performed with a rendering intent5 that is chosen on the table row, relative to the image that we are converting, or the global one, if we chose this option, available below the pop-up of the working color spaces.
Conversions to output profile
To enable the radio button "output" it is before necessary set the "bypass ColorSync" check box to ON, see note.
Clicking on the radio button "output" we perform a conversion of the image from the currently used color space (that may be the working profile, when used, or one between the assigned and the embedded) to the color space chosen in the pop-up of the output color spaces.
As for the working, this conversion is performed with a rendering intent5 that is chosen on the table row, relative to the image that we are converting, or the global one, if we chose this option, available below the pop-up of the output color spaces.
Note: the original image is'nt in any way modified by the adjusting done inside FitPlot.
You can, however, save the adjusted image as tiff with the command "export single image as TIF", available also in the toolbar with this icon: ![]()
Meanings of the cells's colors
Assignment and conversions cells may assume three different colors (states):
- Green : the color profile is active and corrensponding to the one chosen in the relative pop-up.
- Yellow : the color profile is active but not corrensponding to the one chosen in the relative pop-up. This suggest that, if we have changed the profile in the pop-up, the profile currently used is different and it may be needed a confirm (clicking on the radio button). It may happen also that, when re-opening a FitPlot file on a different computer, the active profile it is not present on that computer, so it is not available in the pop-up. In such cases, the profile is regularly active for that image, but it cannot be applied to other images because it is not in the system. To avoid this kind of problem, please read the note: Portability of color spaces3.
- Red : The color profile is not in use.
Operating principles
After describing the available controls, we see now what is their real purpose and how we can make profitable use of them with an example.
The purpose of the color management is to "translate", in the best possible way, the colors of the original image in the colors reproducible with the output device. The color profiles are the "dictionaries" that allows the correct translation.
We may start from an initial color space, usually provided by the capture device (ideal situation) and a final one, that is given by the combination printer / print media and is usually, either provided by the device producer or home-brewed using special colorimetric tests (ideal situation).
In the real world, however, there will often not-ideal situations, where we do not know neither the color nor the profile of a certain image capture device, or we do not know the ideal profile for that particular printer with that particular type of paper.
In these cases, wherever you go, you go blind, and you cannot yield the best result if not for attempts. You can, however, take advantage of the little that is known to get a decent result.
Anyway, we manage the appropriate conversions in FitPlot, having always visible the preview of the result in our monitor (softproof). Then, in the print dialog, it will be enough to use some precautions to avoid "blind" conversions in the printer driver (see bypass ColorSync®).

Diagram of workflow as conceived in FitPlot
The ideal case
In the ideal case, the first prerogative is to have the image already provided with an embedded profile.
That profile is, typically, directly provided by the capture device (scanner, camera, etc.) and it is definitely calibrated by the device producer.
It is because of this fact that FitPlot doesn't allow to re-assign a new one to the images that own an embedded profile. That is already the best possible profile, it constitutes, in a certain way, a dictionary that allows to "translate" the image in another "language", that is in another color profile. If we change the dictionary with a different one, the translation will be, unavoidably, full of "errors".
The second prerogative is the knowledge (and availability, on the computer we are working on) of the right profile for the combination of printer / printer media on which we are going to print on.
With these two prerequisites, it will be enough to convert our work in an appropriate output profile, corresponding to the one of the binomial "printer / media" that we will use for printing.
Subsequently, in the print dialog, you must be careful to avoid any automatic choice of the profile, setting ourselves the right one.
Usually, in the print dialog, you must look for the option "Color Matching" and once there, choose the same profile we have used in our conversion in the FitPlot color management panel.
So, the sequence of actions is the following:
- Open the color management panel [cmd shift C]
- Click on the option “bypass ColorSync” to activate the pop-up of the output profiles
- Choose the output profile for the printer and the paper to be used
- Select the row of the image to modify
- Choose the rendering intent5 to use in the conversion to output
- Click on the radio button in the cell "output" to confirm the change
- This done, the image is converted in that profile and we should see the new aspect in the image on the monitor (sometimes the change is minimal!), the "output" cell changes from red to green and the radio button turns to ON
- Choose the print menu and, in the dialog, disable automatic profile switching, in this way you can select by yourself the same profile you have set for the output (see note "bypass ColorSync®" to set the right options in the print dialog, Please note: the print dialog can significantly vary from manufacturer to manufacturer!)
Note: in the previous case, as we have just seen, we had not used the working profile, there was no need. Both working and output profiles are "optional". If they are not used, when the document is printed, it will be performed an image conversion from the current image profile (embedded or assigned) toward the printer profile (based on choices we may do in the printer dialog, upon the quality, the kind of paper etc.).
Whenever we want to "govern" this behaviour, we must perform a "guided" conversion, using the output profile as explained before (ideal case).
Most common cases
When we have different images, eventually with embedded profiles different (and sometimes missing), then it will be needed to assign the missing ones in advance, then convert in an appropriate color space (typically one with a wider range, such as sRGB, proPhoto or AdobeRGB), checking on the monitor the chromatic changes happened. Subsequently it will be necessary a conversion to the output profile as seen before, in the final part of the ideal case.
Let us see how to perform the assignment of a profile on a single image (with missing embedded profile!):
- Open the color management panel [cmd shift C]
- Select the row with the image to modify
- Select the profile to assign in the relative pop-up (RGB, CMYK or Gray, depending on the image color model)
- Click on the radio button in the "assigned" cell to re-assign the chosen profile
- Once done this, the image acquires that profile and we should observe a change on the screen (some times the change is minimal!)
Conversion of a single image to working color space
Once the images own their [mandatory] initial profile (embedded or assigned), it is possible to perform the conversions toward other color spaces (working profile or putput profile).
Convert from a color space toward another, means to translate the color of each pixel of the original image in an "ideal" color, representable in the second color space.
In fact the colors representable with a certain printer are a subrange, more or less wide, of the colors that human eye is able to perceive. The more this range is wide, the better is the printer. The same applies to the acquiring devices (scanners, cameras etc.).
- Select the row with the image to modify
- Select the profile toward which we wanto to convert in the pop-up of the working color spaces
- Optionally we can click on the “bypass individual rendering intent (working)” and choose the desired item in the global rendering intent5 pop-up, just below (this will be used for all eligible images in the document)
- At this point, acting individually on each image, we click on the radio button in the cell "working", to convert the image into the chosen profile
- Once done this, the image acquires that profile and we should observe a change on the screen (some times the change is minimal!), the working cell color changes from red to green and the radio button turns to ON
Conversion of a single image to output color space
- Click on the “bypass ColorSync” checkbox to activate the pop-up of the output color profiles
- Select the row with the image to modify
- Select the profile toward which we wanto to convert in the pop-up of the output color spaces
- Optionally we can click on the “bypass individual rendering intent (output)” and choose the desired item in the global rendering intent5 pop-up, just below (this will be used for all eligible images in the document)
- At this point, acting individually on each image, we click on the radio button in the cell "output", to convert the image into the chosen profile
- Once done this, the image acquires that profile and we should observe a change on the screen (some times the change is minimal!), the output cell color changes from red to green and the radio button turns to ON
- Finally, choose the print menu and, in the print dialog, disable any automatic setting of the profile and, instead, choose the same profile that has been set in the conversion toward the output (see note "bypass ColorSync®" for a correct settings of the options in the print dialog).
Please note: the print dialog can significantly vary from manufacturer to manufacturer!
Notes:
Images of kind bitmap
They are not considered bitmap, so they are not considered eligible for the color management features, the files of type pdf or eps, even if they contain bitmap images, and the groups created in FitPlot (unless decomposed in its original elements and these elements are of type bitmaps).
ColorSync®
Until now, the whole color "chain" was managed, in FitPlot, by the well known Apple®'s ColorSync®. In this way, it was easy, for inexperienced users, import and print images without caring too much of the color correspondances, correspondances that were fully honored for images with embedded profiles, while it was being used the sRGB color space for all the others.
ColorSync® was assigning a color space to the images that were missing an embedded profile (sRGB in the latest MacOS versions, from Snow Leopard). When printing, in the old version of FitPlot, the Apple© printing framework produced a spool pdf where each image had a profile (the sRGB assigned or the one embedded, if present).
During the printing, it happened a last conversion from the images profiles toward the printer profile, therefore from sRG (or the embedded profile) toward printer profile.
If the printer profile and the image's profile were corresponding, there wasn't any conversion and the color correspondance was exact, in all other cases (the most common case) the correspondence was "adapted", and, most of all, this happened without any control.
Even now, in the FitPlot color management, ColorSync® is the engine used in the conversions and it can be used in the Apple© printing framework to create the spool pdf. The substantial difference, with the new controls now available, is that we can convert the images in the most appropriate color spaces, with the chance to get the best results, particularly in that situations where a higher level of quality is required.
The eye of the layman can not distinguish between two color shades, but the trained eye, or better yet a colorimeter, an instrument that is not lacking in a professional printing lab, they perceive the difference.
The usage of printers and printer medias of high quality and, most of all, of instruments and hardware for calibration and color control, allow to organize a custom-tailored color "flow", resorting to the creation of in-house made color spaces, if they were not available in the printer's package, to better interpret the passage from original image (with the capture device profile embedded) and the final image (printed image).
-
Portability of color spaces
The available color spaces may vary from a PC to another, depending upon some application's installation that brought a kit of color profiles for its use, in the installed package (for example, Adobe Photoshop is one of these). Furthermore, we may have created anew (with colorimetric calibrations etc.). It may happen that, after saving a document with images on which we have assigned a certain profile, this came out unavailable on another machine where we open again the document. The image still maintains the assigned profile, but this will be not available in the pop-up items. It is strongly advised to provide also the profiles files (typically of type .icc) to be installed also on the second machine.
Bypass ColorSync®
The expression Bypass ColorSync® is very synthetic, for shortness, this may be misleading. The extended phrase should sound as "bypass the automatic choice of profile by ColorSync© ".
As we have seen, the bypass ColorSync© checkbox allows to enable the controls to set the output profile. This options has not the power, by itself, to exclude the ColorSync© automatisms in the printing process. We must do this "by hand", anyway.
FitPlot rely, for printing, on the Apple© printing framework and on the drivers that are loaded each time we choose a printer.
It is therefore necessary manually change a few options in the print dialog.
FitPlot cannot do this automatically in our place.Each printer manufacturer has the task to implement the drivers for the device he produces.
The interface (print dialog) could be different (in some options) from manufacturer to manufacturer.
Into the print dialog we must search the Color Matching options, then the item ColorSync, excluding the automatic choice of the profile, selecting the ➛ profile that we have chosen for output (here below we can see the ColorSync option for an Epson® printer).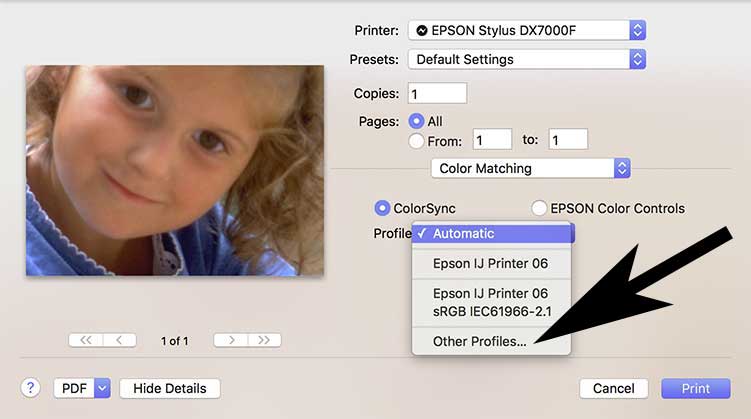
Print dialog, Color Matching optionsRendering intent
During the color conversions of an image, the colors represented in the original profile that are included in the range of the destination profile, are left unaltered, while the colors that have not correspondance, or that are very near to the limit, are "translated" in a suitable color, provided via an algorithm (CMM engine) and from a rendering intent.
FitPlot allows to choose the more suitable rendering intent between these options:- Absolute colorimetric
- Relative colorimetric
- Perceptual
- Saturation
- BPC relative*
[*] This is, actually, a relative colorimetric rendering intent, but with Black Point Compensation.The Black Point Compensation converts the black of the image in the maximum black that is possible to reproduce in the destination profile.
Changing the rendering intent causes an image chromatic variation, visible on the screen (even if the change is, sometimes imperceptible, or null, in case the colors involved are included in both source and destination profiles).
For a deeper comprehension of the rendering intents purposes, read the Wikipedia article at this address.