System requirements
FitPlot from 6.0 needs at least Mac OS 10.9 and is downloadable only from Mac App Store.
FitPlot from 4.5 to 5.8 needs at least Mac OS 10.7.3 and is downloadable only from Mac App Store.
FitPlot 4.0, 4.1, 4.2 runs on Mac OS X 10.6 (Snow Leopard), Mac OS X 10.7 (Lion), it is available exclusively trough Mac App Store.
FitPlot (3.5 and more) runs on Mac OS X 10.5 (Leopard), Mac OS X 10.6 (Snow Leopard).
Previous versions (2.6 through 3.0) run also on Mac OS X 10.4 (Tiger).
Previous versions (2.5 and earlier) run also on Mac OS X 10.3.9 (Panther).
See the Changelog for further informations or contact the author (use the form at page bottom) to know your suitable version.
Memory warning
WARNING:
usage of very big images is limited by the impossibility due to the operating system to allocate enough contiguous memory. This limit, in 32 bit systems, is 4GB (virtual), practically there may be problems even with 1GB images if the contiguos space in RAM or virtual RAM is unavailable; in 64 bit systems (with FitPlot 4.2 and more) the virtual memory limit rises to 16EB (Exabyte = 2^63 bit) theoretical, practically speaking it should be easy to find some terabyte contiguous.
CAUTION:
opening a FitPlot document with very big images or inserting one or more very big images could cause, in 32 bit FitPlot, memory leaking problems and even in 64 bit FitPlot, the time to complete all operations may be very long!
Tip: to avoid such problems try to reduce images dimension or try to work with few images at a time.
Installation
Shareware versions [until FitPlot 4.0].
Just drop FitPlot folder into your applications folder. Actually you can drop into applications folder just the ![]() FitPlot application leaving out the folder containing the readMe and accessory files.
FitPlot application leaving out the folder containing the readMe and accessory files.
The first time you run FitPlot, a preference file will be created in your library. The next new document will get preferences from the last one opened.
Note: The first time you'll save a template file (see note below), a new folder (com.pamarcu.FitPlot) will be created in ~/Library/Containers/ to host your templates. It is here that FitPlot browse first when you call the File -> New from template -> Browse… menu.
The exact address where resides the folders used by FitPlot services (temporary files, logs, templates), since MacOS 10.7 is: ~/Library/Containers/com.pamarcu.fitplot/Data/Library/Application Support/com.pamarcu.fitplot/.
Printer Margins Setup
The very first time you start FitPlot you should determine your printer margins.
Printer margins are factory preset that is very useful to know. Once set, you can see on your page, at a glance, the border's areas that will not be printed.
Open the Tools -> Setup margins dialog and fill the fields with the known printer margins.
Suggest for printer… popup. From the 2.9 version you can choose one from the list of available printers, the program automatically will get the margins for you taking it from the first of the available formats belonging to that printer.
This is usually correct for almost all situations, but sometimes there should be cases where the printer driver allows different margins for the same printer, for example devices that allows border-less printing.
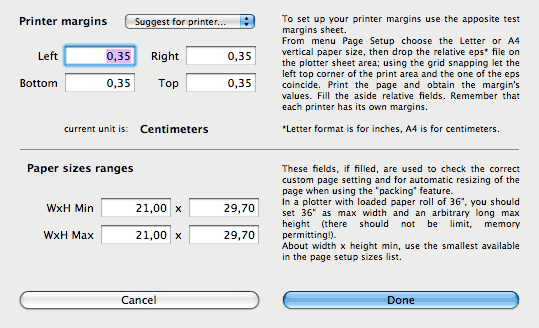
Click the "Done" button to confirm, you should see now a red lined area around your page. This inside is the safe bounds your printer is able to print.
Note: if you don't know exactly your printer margins, there is an empirical test you can take:
along with the program package there are two test files:
| test_margins_A4.pdf | (for unit centimeters) |
| test_margins_letter.pdf | (for unit inches) |
Usage of test margin files
- Simply drop one of this files on fitplot window, set the page to A4 (or letter) according to the file you dropped.
- Activate the appropriate unit (centimetres if A4, inches if letter).
- Set the grid snap on and hang the left-top corner of the dropped image to the left-top corner of the page (the origin).
- Print the image and examine the results. Now it is easy to fill the margin fields in the Tools -> Setup margins.
- Remember: each printer has its own margins!
A note about templates…
Margins, as long as all other document settings, are saved with files. You can save these documents as templates in a special directory in order to have them at once (from the file menu), avoiding to call the page setup menu each time. In this way you can organize your templates per printer/plotter (creating new folders).See more about templates.
About the nesting feature…
You can optionally fill the paper sizes ranges fields in order to check the quick page resizing from the main window and the nesting algorithm, giving it the chance to auto-resize the paper according with these ranges.
See more about the nesting functions..
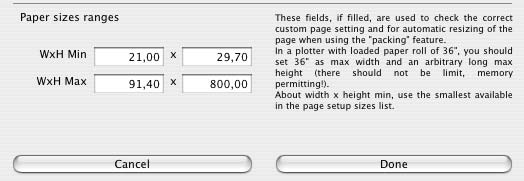
You should take your plotter minimum size from the page setup menu (the smallest in the paper size list). About the maximum size, width should correspond to the loaded plotter roll (24", 36", 42" ecc.), height may be set to an arbitrary long value (let it be 315" or even more, if you have enough RAM space).
Note: If you set all ranges fields to 0, they will not be considered in the nesting algorithm.
Organize your workplace
Since FitPlot is aimed to productivity, it is customizable in most of its aspects to get the best in every situation.
To accomplish this task there are:
- Templates (FitPlot documents that have commonly used settings and that opens as "Untitled" documents)
- General preferences and document preferences
- Workplace organization hints
- To know more about templates take a look at Templates organization.
- To know more about preferences take a look at Preferences settings.
- To know more about other workplace organization hints look at Workplace organization in the usage and commands topic.