Nesting / Packing

With the Nesting tool ![]() the name of the application "fits" better its meaning.
the name of the application "fits" better its meaning.
The first raw attempt of nesting algorithm has been now replaced by a better performing new one: the MaxRects Algorithm.
NOTE & ACKNOWLEDGEMENTS:
the MaxRects Algorithm used in FitPlot is inspired by the work A Thousand Ways to Pack the Bin - A Practical Approach to Two-Dimensional Rectangle Bin Packing by Jukka Jylänki. The adopted MaxRects algorithm has been furtherly optimized and customized for the program needings. For technical explainations see the MaxRect Algorithm at the end of this page.
The Floor / Ceiling Algorithm is based on the work Algorithms for Two-Dimensional Bin Packing and Assignment Problems by Andrea Lodi.
A short video lesson shows a practical example of nesting usage:
Foreword:
The packing algorithm takes into account the boundaries of each implied image.
Bound means the minimal rectangle that contains the image. This means that when an image is rotated, its bound will be no more represented by the simple dimensions AxB of the image, but by a bigger size rect, according with the rotation.
Since FitPlot 5 version any applied style may contribute to the image bound (textual tags, strokes, trims, shadow) so that the packing algorithm takes it into account.
Also groups, introduced with FitPlot 5, have a bound on its own. It is given by the sum of the bounds of each single component when the group is created then modified according with group scaling, rotation and clipping.
Usage of the command
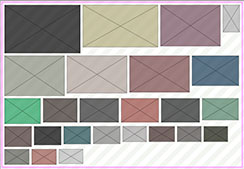
Clicking on the nesting tool (or choosing the nesting menu item), you can obtain a distribution of the images toward the top of the page.
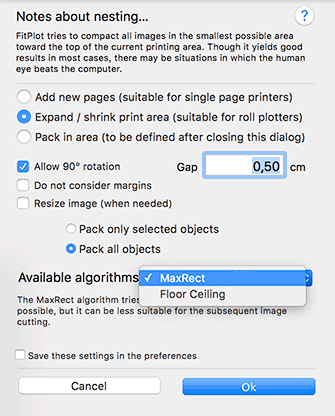
The pack… command brings up the nesting dialog:
Quick menus
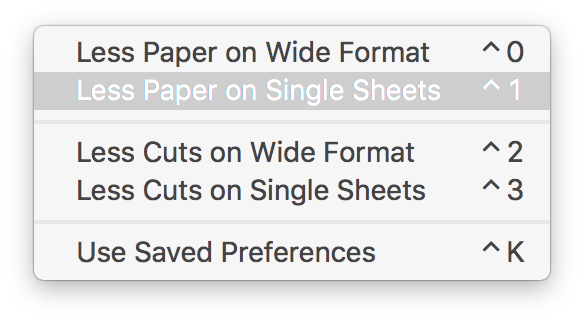
For practical reasons, we have prepared for you some menus to perform the packing / nesting command without the need to pass from the main dialog.
The items represent typical cases you may encounter in your job routine and available with FitPlot mixing various parameters combinations (that are finely tuneable in the packing main dialog).
The final result will depend also from some other variables (that are actually set in the defaults of the command) and, most of all, from the number and diversity in sizes of the images involved (probably few images will yield thea same results also with different menus, while with many more images the results will tend to reflect the menu meaning).
The last item, [use saved preferences] execute the command with all the parameters currently set in the program defaults. These variables are saved (optionally) each time you exit the packing dialog, either are customizable in the preferences panel preferences panel packing/nesting tab.
Advice: write down the keyboard shortcuts for an even quicker usage of this or other commands.
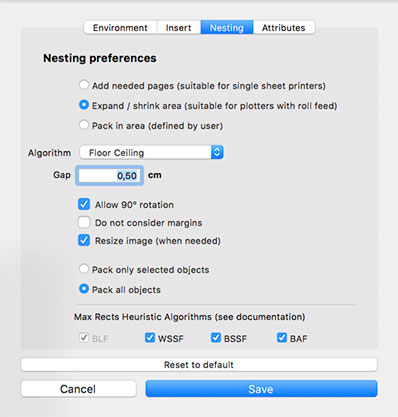
There are two packing algorithm available in FitPlot:
MaxRects: this is the one that (usually) saves more space, trying to fill every available space, with detriment of the images alignment. In the end, in case of many images of different sizes, the result could be very staggered.

Floor / Ceiling: in this we prefer a more comfortable disposition instead of saving space. Images are placed along ideal lines (floor / ceiling). The paper wastage is usually larger than in MaxRect, but we'll have an advantage in an easier trimming, in the end.
No matter what algorithm chosen there are three types of packing possible:
- Add new pages (suitable for single page printers)
- Expand / shrink print area (suitable for roll plotters)
- Pack in area (defined by user)
Add new pages: In this case the algorithm try to fit the images in the current page. When there is no place left, a new page is added and the fitting continues until all images are placed. In the end, all pages are showed in the pages drawer.
Expand / shrink print area:
The images are fitted adapting the single page length / width (the page is in fact considered as a roll).
For this particular case (auto-resize), 4 new fields have been introduced in the margins setup dialog with min and max paper sizes for the current printer. With this informations the program knows how to expand / shrink the paper size according with the packed images on the document.
With these informations the algorithm can know how to expand / shrink the page size for a best distribution of the image s on the sheet [see note at bottom of this page].
Pack in area: images are placed inside an area that the user should define once prompted.
When exiting the nesting dialog the following message will be showed:

At this point we should define an area with the mouse (click and drag) to contain images to pack. To make easier this operation, before to start to click and drag, you can zoom out, scroll and do all is needed to see the whole area to select.
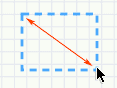
After the click and drag, when the mouse is released, if it is possible, images to pack will be fitted in the just defined area.
The other options in the nesting dialog are described here below:
- Gap: if you want your images packed leaving a space around their perimeter (to have space for trims etc.), then type some value in the gap field.
- Allow 90 degrees rotation: if you check this, the algorithm knows that images can be rotated, so, if there is a convenience, some image may be rotated for a better nesting result.
- Do not consider margins: there are several cases where the image size coincides with the page size (think of an A4 pdf). In such cases, normal nesting (one image per page), will not work unless you do not check this item. In this way the whole page size is eligible to be the bound of your image. This option is not available with the pack in area mode.
- Resize image (when needed). When this option is checked, the packed images exceeding the page size, are automatically "resized to fit" the page.
- Pack only selected objects: with this option you can pack only a set of selected images (for example to fill a particular area with some images, leaving the other untouched). Note that with the automatic nesting (available optionally at insertion, see advanced insertion section), images just imported are the only ones to be selected.
- Pack all objects: this is the default nesting. It acts on all the objects currently in the document, independently from their selection.
- Save settings: you can save the nesting settings in the preferences in order to save these values. These settings are used by some automatic task at images insertion.
Tip: you can nest images at any moment bypassing the nesting dialog holding the option key while clicking the nesting tool .
.
The nesting type and settings used will be the ones saved in the preferences.
Margin setting (for nesting algorithm)
Choose setup Margins from the Tools menu and fill the fields for page ranges.
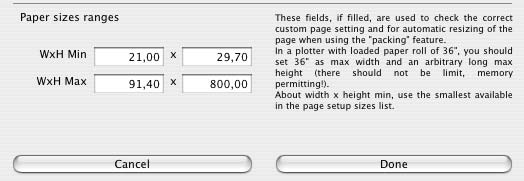
You should take your plotter minimum size from the page setup menu (the smallest in the paper size list). About the maximum size, width should correspond to the loaded plotter roll (24", 36", 42" ecc.), height may be set to an arbitrary long value (I have set it to 6 meters [about 236 inches] on my HP Designjet 500PS with no problem at all).
Note: if all ranges fields are 0, they will not be considered in the nesting algorithm.
Nesting preferences
Each FitPlot document (also a template) can have its own nesting preferences that are set in the preferences dialog (nesting section).
The parameters we can set here are the same already seen in the nesting dialog.
Once you have set a parameter in the preferences, you'll find it also set in the nesting dialog, also you can use these set parameter(s) when clicking in the toolbar nesting button ![]() with the option [alt] key pressed.
with the option [alt] key pressed.
Moreover, here in the nesting preferences dialog you can see what are the algorithms used in the nesting operation. A technical note about is explained in the following paragraph.
The MaxRects Algorithm
MaxRects heuristics. The MaxRects algorithm "decides" to give a "score" when placing an image in the available area. This score is calculated by the algorithm in different ways basing its decision on heuristic methods. Different methods may yeld different (usually slightly) results.
The algorithm is very fast, so you should not to worry to keep all heuristic methods ON.
The nesting operation performs all the checked heuristics off-line, examines the results (number of pages for the multipage nesting, max reached Y for the single resizable page) and chooses the best, then re-executes the nesting with the best method until the end.
This may be matter of a heart-beat, in most cases, but when dealing with hundreds of images, it may make a difference in calculation time, this is the reason why I let the option to put OFF up to three of four methods.
At the moment FitPlot includes the following 4 heuristic methods:
- BSSF Best Short Side Fit: Chooses the images whose fit better in its short side. This is elected as default and obligatory algorithm (you have to use one!) since is the more suitable for general cases.
- WSSF Worst Short Side Fit: This is the reverse of the BSSF. It is optional.
- BLF Bottom Left Fit: This tries to keep the pack as low as possible, it is suitable for page resizable nesting, cause results in a minor height (waste) of the resulting page.
- BAF Best Area Fit: Another interesting way that prefers the best area fit score.